
Getting Started
this chapter will give you an overview of the basic functionality of the CDE and its functions. Following these fairly simple step by steps instructions you will have your first "Hello World" Application developed, tested and deployed.
Step 1: Registration
Tiktag requires you to sign up for an account. This is to make sure only you have access to your source-code and project data. If you don't have an account you need to sign up for an account. On the top right of you screen you will find the "sign up" button.
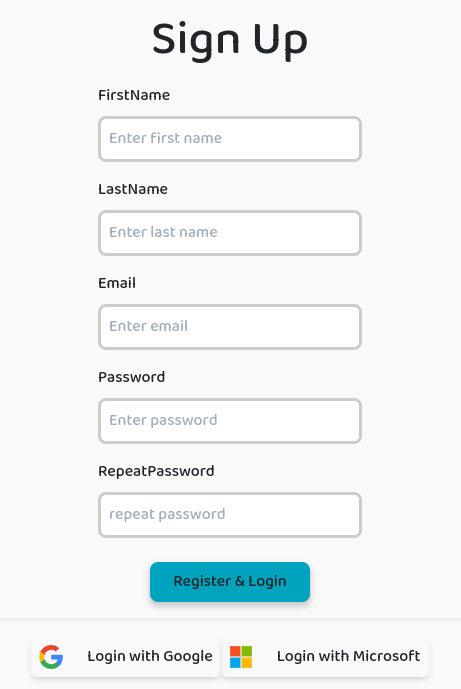
Basically you have three options to sign up your personal account. Either you will register by email, or using your Google or Microsoft Account. In case you have signed up with your google and microsoft account you should know these will be seen as two different account, therefore you project and source-code data cannot be shared accross accounts yet.
Step 2: getting used to your new CDE
After the registration process is completed successfully tiktag will automatically create your first project for you, so you can start coding immidiately.
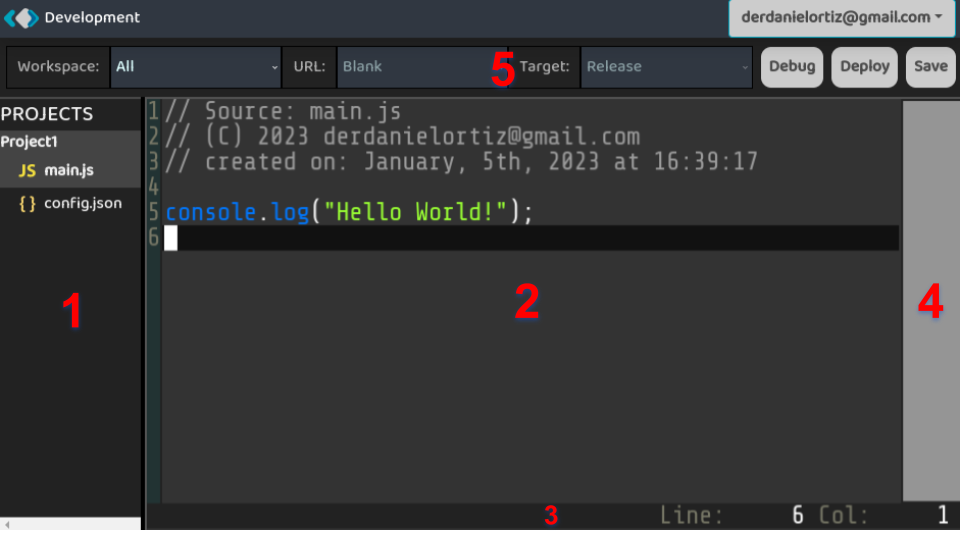
Area 1: Project- and Filebrowser
The two main functions in this view is to switch the file to be edited and to create new projects and source-files by using the context-menu (right click). There is no limitations in the number of projects and number of files per project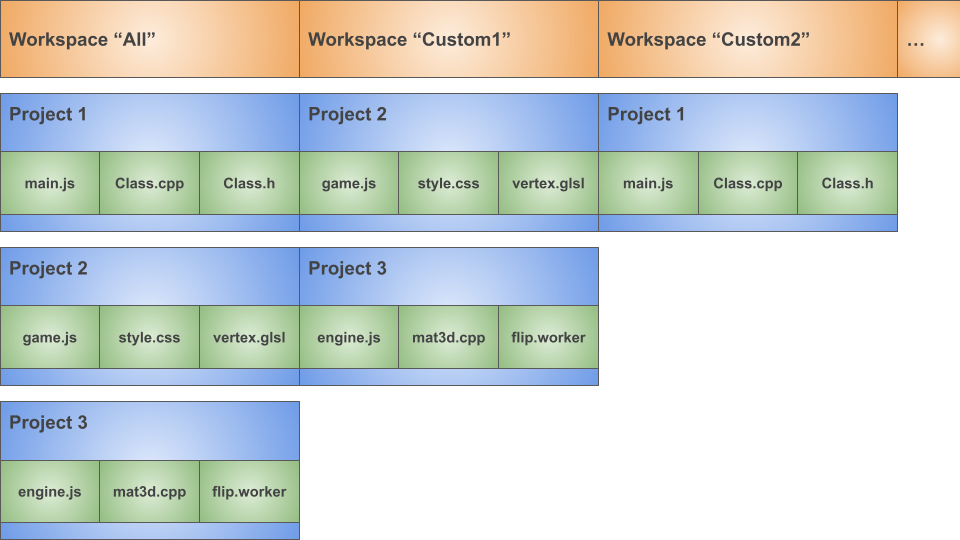
The above scheme illustrates the relationship between workspaces, projects and source-code-files. A Workspace can be associated with any project. It represents a workspace-view. It is recommended to use this feature to create your personal project-view, so you can focus on project(s) you would like to see in this scope. A project can be attached to as many workspaces as you wish, so that you can customize your perfect workspace.
The workspace "All" is predefined, so that you can choose this workspace to see all of your projects in your file- and project-browser view.
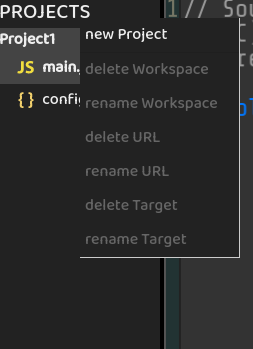
It is important to know that you basically have three different clicking-areas inside the projects- and file-browser, so you get different options in your context-menu. By right-clicking on the title-bar "PROJECTS" you will get the following context-menu, so you can choose from its options. All of these options either relate to the maintainance of projects / workspaces or to future customization-features (currently disabled)
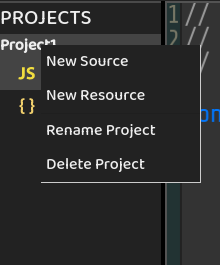
The project-view context-menu is scoped to all file-inventory and project-adminstration, so you can create new Source-Code for you project here. Note that the file-type is bound to its processing in the build-environment of tiktag on an internal level. Currently following file-types are supported by tiktag:
-
.js: Javascript, ES6-Code + JSX -
.cpp: C++ class/file - Implementation, matches g++ definitions -
.h: C++ header/file - class-definition, matches g++ definitions -
.worker: Javascript, ES6-Code + JSX -
.css: html-stylesheets, which can be used in html-code/jsx -
.glsl: OpenGL ES Shading-Language to be used for fragment or vertex shading-code
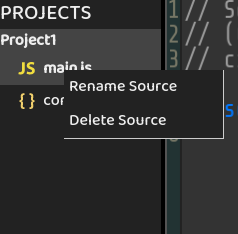
The third file view context menuallows you to either remove or rename source-code files. The source-type cannot be changed after creation. The area allows you to select the file for editing by selection.
Your config.json file is essential for the build-process. By default it will look like this:
{
	"entry": "main.js",
	"name": "project1"
}
entry tag defines the main-javascript file to be used for the build-process. The build-process will fail, if you choosed another file-type but .js. Please prevent typos or any other format-corruptions - make sure the JSON format stays correct to avoid build-errors.
The name defines the project name.
The entry key defines the main JavaScript which will be the root of your project.
Area 2: Code Editor
The tiktag Code-Editor is a fairly simple code-editor. Please not that the editor was written from scratch on the basis of a canvas-html object to be as browser-independent, as fast as possible and open to inventions and extensions. In a later version we will release an api, so you can write any PlugIn you like and share it with the tiktag community. The low-level character of the editor has an impact on firefox-based browsers as they cannot use the navigator.clipboard API. We hope that firefox will implement this feature as well, otherwise you are not able to use the copy & paste clipboard functionality. On top of processing char-input tiktag offer following key-strokes:
CTRL + a: Range entire TextCTRL + s: Save FileCTRL + c: copy ranged text to clipboardCTRL + v: paste text in clipboard to current cursor positionCTRL + x: cut ranged text to clipboardRANGED TEXT + <TAB>: add tab on each line of selectionRANGED TEXT + <SHIFT> + <TAB>: remove tab from each line of selectionRANGED TEXT + <SPACE>: add space on each line of selectionRANGED TEXT + <SHIFT> + <SPACE>: remove space from each line of selection<ESCAPE>: toggle betweenCOMMAND-Mode andEDIT-Mode
Area 3: Status Line / Command Mode
As explained above the ESCAPE-Key will toggle between COMMAND-Mode and EDIT-Mode. If you are in EDIT-Mode you would see the status-line showing the current cursor line and column.
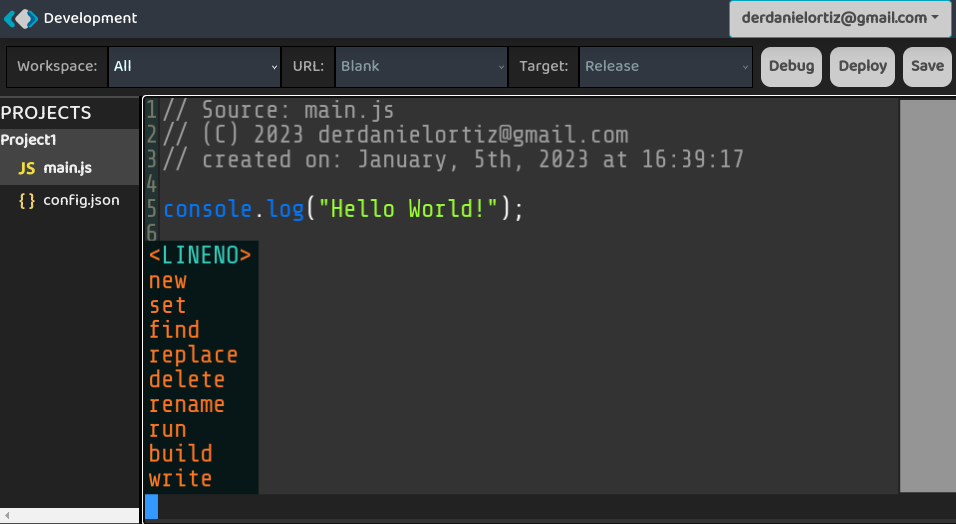
The basic idea behind the command-mode is to reduce the number of key-strokes triggering your favourite functions as quick as possible. In contrast to vi or similar tools tiktag displays contextual functions, when operating in Command-mode
As this is an entirely new function we really appreciate some feedback to optimize and extend this function according to market needs. On request we could also think about providing an API for the customization of your personal sets of commands.
Area 4: the tiktag scrollbar
the reason why the scrollbar is a bit thicker than usual is that it works in both direcions, so you can move the text by the x and y axis at the same time - there is no need for a separate x scrollbar. Next to many other functions this is another invention in tiktag which we hope you like.
We think it is worth mentioning as this feature behaves different from any other text-editor.
Area 5: menu - navigator
On the left side of the navigation-bar you will find the Workspace dropdown list, which allows you to either select a different workspace or maintain (create or delete) workspaces. Remark, that the attached projects will not be removed when you delete a custom workspace.
The next two Dropdown-lists URL and Target are not yet implemented, but will be available in the future.
Whilst the Save Button is used to store the current source-code the remaining buttons Debug and Deploy will be explained in the following chapters.
Step 3: debug your first App!
The first step to visualize your first tiktag App is to replace the systems' generated main.js-code with the following code and press CTRL + s or the Save-Button to save your changes:
import {_newTag} from "./tt/ttHTML.js";

var data = "first";
var elemDiv = <div><h1>My {data} tiktag App</h1></div>;
document.body.appendChild(elemDiv);
Next you should trigger the Debug-Button, which will start the build-servers to prepare, compile and deploy your debug-code, so that only you can test and access it - this could take a while, so please be patient until you received a success-message an tiktag opened up a tab showing the result of your first program. The result should look like this:
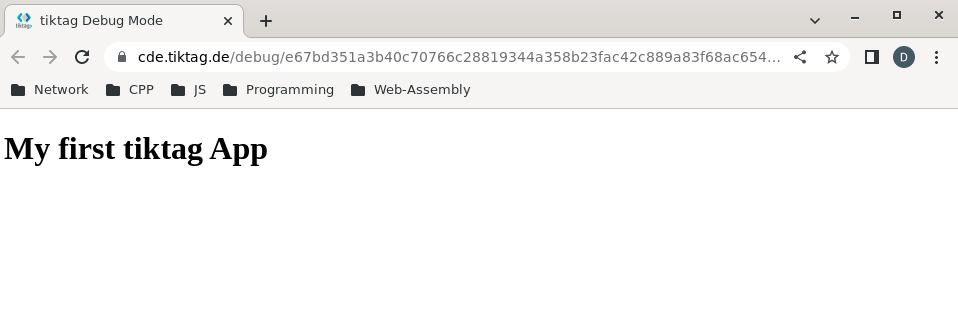
This example shows one basic function of the tiktag framework which is the JSX feature. The framework as such will be explained in detail in the reference and tutorial sections of this documentation.
The Debug button triggers the tiktag server-side build-mechanism to deploy a tag in a way that it can be used by the current tiktag user only. This means, if you are not logged in or logged in with a different user you can not execute your debug-build. This is to ensure that nobody else but you is able to access your app while it is in development neither by accident or on purpose.
Step 4: combine best of two worlds: Javascript and C++
Usually C++ is being used as a programming language to develop realtime applications like operating system, computer games, performance hungry musical or graphical editing applications. As one early high-level language C(++) was designed as a compiler, therefore translates source-code into binary code optimized for the targeted CPU-Architecture.
It was developed to keep close to "meta" machine-language standards or assembly-language, where you will find tools like pointers and offsets. This allowed you to optimize code in C++ which was close to the machine but independent from the CPU-Architecture. Since the 1970's until today C++ compilers were optimized to execute fast (performance) or small in code-size.
Web-Assembly therefore is treated by a C++ Compiler as an additional CPU-Architecture or Target to compile to. Since modern Javascript run-time engines like v8 are working in a JIT-compiler mode instead of the slower interpreter-mode its execution-performance improved drastically over the years. Javascript is a language full of intelligent luxury features and flexibility which could come at a cost - slower execution speed. It is helpfull to understand and master why the result of
var res = 2 + "2";22, but it is not really required for know - Knowing, that binary array operations or calculations will run faster written in C++ pretty much nails it. Here you will find two source-codes, once Javascript and one C++ Sourcecode. You should create a new project, replace your main.js with the following code and save it:
main.js - code
import {_wasmInitA} from "./tt/ttWASM.js";
import wasm from "./web.wasm";

const NROUNDS = 100000000;

var lst = new Array(NROUNDS);

// Javascript Implementation
function createList(rounds)
{
	for (let i = 0;i<rounds;i++)
		lst[i] = 141;
	return lst;
}

async function main()
{
	/* This makes C++ Functions available to Javascript */
	var wobj = await _wasmInitA(wasm, {}, null);
	console.log ("WASM initiated");
	console.log ("Starting JS");
	var t0 = performance.now();
	var res = createList(NROUNDS);
	console.log ("Access: "+res[23]);
	var t1 = performance.now();
	console.log(`Call to js Function createList took ${t1 - t0} milliseconds.`);
	/* call C++ Function to allocate Array Memmory*/
	wobj.exports.init(NROUNDS);
	t0 = performance.now();
	wobj.exports.createList (NROUNDS);
	t1 = performance.now();
	console.log(`Call to c++ Function createList took ${t1 - t0} milliseconds.`);
}

/* Call async main Function to start the process */
main();
As a next step create a C++ - File. As the exported functions are not bound to the filename, you can freely choose; In this example the proposed name is perf.cpp. Now paste the following source-code to newly create C++ File:
perf.cpp - code
#include "tiktag.h"

/* define Array Pointer to be available globally */
int* _ptab;

_export void init(int rounds)
{
	_ptab = nullptr;
	/* allocate memory for Array-Data */
	_ptab = (int*) malloc (sizeof(int)*rounds);
	if (_ptab == nullptr)
		consoleLog ("error allocating memory!");
}

/* C++ Implementation fill array Data */
_export void createList(int rounds)
{
	int i;
	consoleLog("Starting C++");
	for (i=0;i<rounds;i++)
		_ptab[i] = 141;
	consoleNum("Access: ", _ptab[23]);
}
Now save your C++, too and press the Debug-Button and wait for the result. tiktag should open a new browser-tab and execute your code. It will not generate any html-output, but it will execute and print its result in the debug-console of your browser, which you typically could start pressing the F12 - key to toggle it on or off. You then will see the console-output of your app showing something like this:
<fname>.js:WASM initiated
<fname>.js:1392 Starting JS
<fname>.js:1392 Access: 141
<fname>.js:1392 Call to js Function createList took 4213.100000000093 milliseconds.
<fname>.js:1392 Starting C++
<fname>.js:1392 Access: 141
<fname>.js:1392 Call to c++ Function createList took 294.89999999990687 milliseconds.
Why is C++ so much faster?
You will see the exact timings individually on your Computer as it is different depending on your hardware-configuration. In this case the C++ implementation of createList is 14.2 times faster than the Implementation in Javascript. There are many ways to optimize this Javascript-Code in this case, so it executes faster. In the tutorials-section I will describe how Javascript and Web-Assembly works in detail, so you can practically improve your tiktag-code executing on an optimized speed.
There are a few reasons why C++ compilers have an advantage when it comes to generating high-performance WebAssembly code:
- compared to other high-level-language C++ is at a lower-level: C++ is a relatively low-level programming language, which means that it provides fine-grained control over system resources and hardware. This makes it easier for compilers to generate optimized code for WebAssembly, which is also a low-level format that provides similar control.
- C++ has minimal runtime overhead: C++ code generally has very little runtime overhead, which means that it can be compiled into very efficient machine code. This efficiency can carry over to the generated WebAssembly code, which can also be very fast.
- C++ has a mature ecosystem: C++ has been around for a long time, and as a result, it has a large and mature ecosystem of tools and libraries. This ecosystem includes high-quality compilers and optimization tools, which can help generate fast WebAssembly code.
Step 5: deploy your project to the public
Both, the debug- and the deployment-build are made available on a public server, however a deployment-build is different:
- It is hosted on a CDN-Network, so that it can be accessed at low latency, which improves loading-times (positive for you web-vitals)
- A deployment-tag is globally accessable, so you can implement it in your web-project as a Single Page Application (SPA) or as a part of your websites functionality, a tag
- There is no html-wrapper for your deployed tiktag-App (.js-file), therefore you will need one wrapper or a direct
<script>-Tag in your html-code to trigger your App either in theheadorbodysection of your website. - As part of the build-chain tiktags' build-servers optimize and reduce the size of your Apps, when deployed.
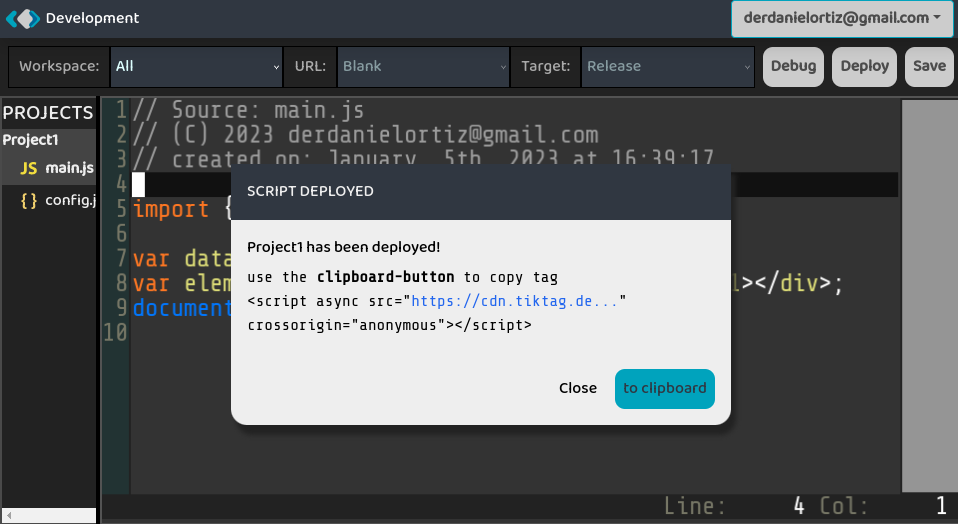
You can now press the to clipboard - Button to copy your script-tag to the clipboard to be used in your web-project. Its content will look similar to this:
<script async src="https://cdn.tiktag.de/e67bd3351ab40c70766c28819344a358b23fac42c889a83f68ac654a84504add5/18ae66bda071ca1942760a8ac0ace2f48a614314169ae7d0afb2ba02f5c77811.js"
	crossorigin="anonymous"></script>